
Maximize Your Bishop In Chess
The bishop in chess has long-range diagonal movement. It thrives in open positions, and depending on the situation, can be either a deadly attacker or an essential element of positional chess strategy.
In this article, we look at 7 ways to get the most out of your bishops. By studying these examples, you will learn how to utilize your bishops more effectively in your own games.
#1: Attacking The Enemy King
The following position was reached in Alekhine vs. Johner, 1934 with White to move.
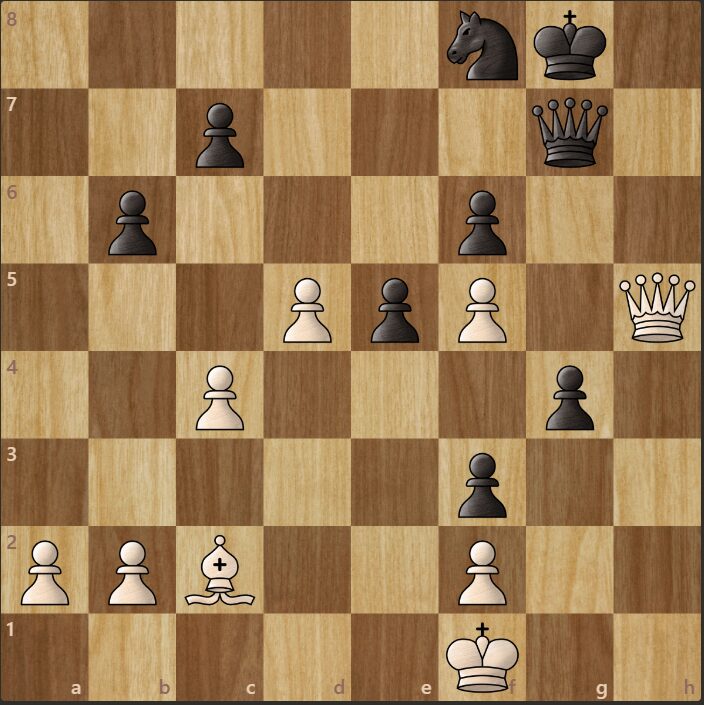
Black’s kingside pawns have advanced, and as a result, the Black king seems rather exposed. The White queen is aggressively placed, but for Black’s king to face any real danger, White must also find a way to involve the bishop in the attack.
However, it seems difficult to do so given that White’s own pawns on c4 and d5 restrict the White bishop’s potential line of fire towards the Black king.
Alekhine found the correct plan - to sacrifice those pawns, beginning with 45. d6!

Through this pawn sacrifice, Alekhine was able to start opening up the light squared a2 - g8 diagonal, with Bb3 incoming to take advantage. This example demonstrates how adept the bishop in chess can be from long range.
Related: Learn from Alexander Alekhine with My Best Games of Chess 1908-1937.
#2: Greek Gift Sacrifice
The Greek Gift sacrifice is a typical attacking combination that involves the bishop in chess. It begins with the bishop sacrifice 1. Bxh7+ (or alternatively, …Bxh2+ if Black is the one on the offensive).
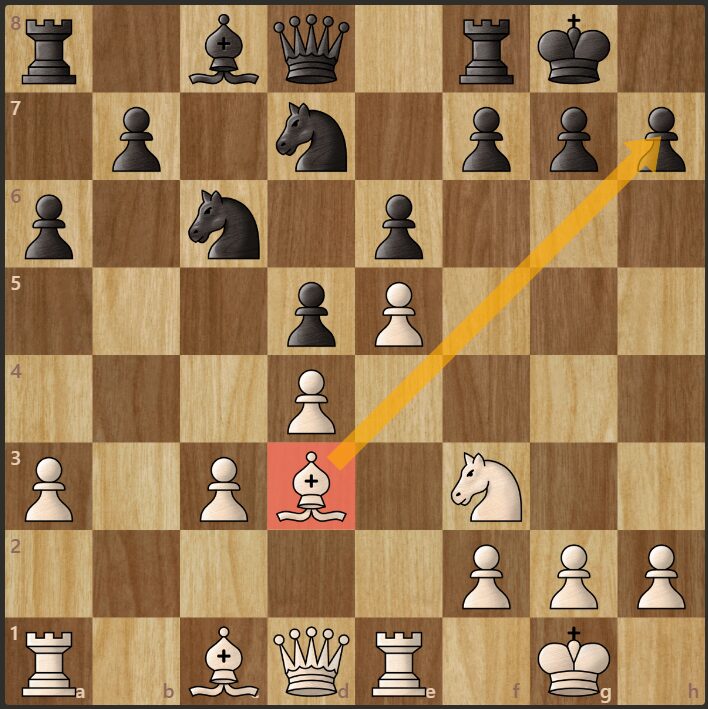
If Black does not accept the sacrifice, then White has won a pawn. But if Black captures via 1. …Kxh7, then White plans to follow up with 2. Ng5+ and - depending on where Black goes with the king - may also play 3. Qh5.
For example, if Black’s king goes back behind its pawns with 2. …Kg8, then 3. Qh5 threatens 4. Qh7# and the only way for Black to avoid being mated is 3. …Qxg5 - giving up the queen.
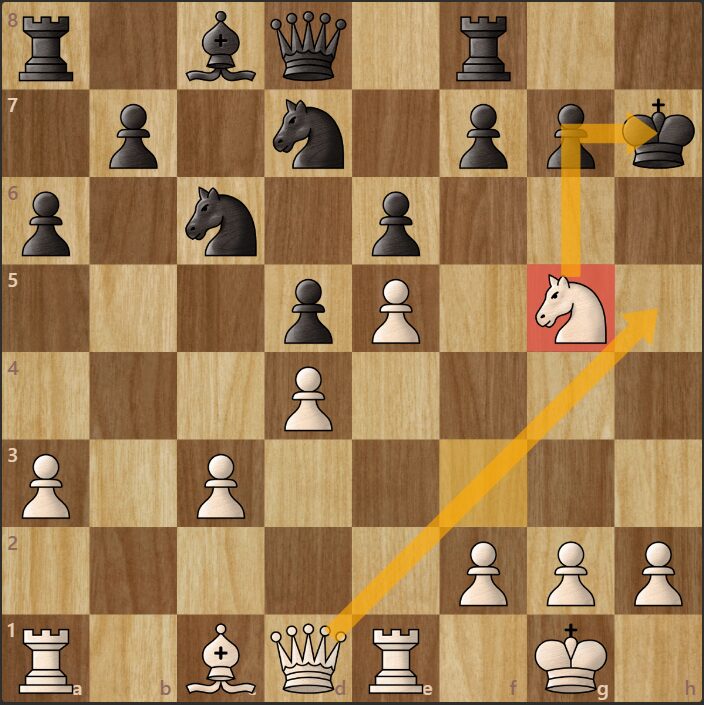
Therefore, the only reasonable way for Black to prevent 3. Qh5 is for the Black king to step out into the open with 2. …Kg6. However, in this case, White should still be able to take advantage of how exposed the Black king has become.
There are certain conditions that make the Greek Gift sacrifice something to look for:
- White’s pawn on e5 prevents a Black knight from standing on f6 (a knight on f6 would render 1. Bxh7+ ineffective).
- Black does not have a bishop on e7 (a bishop on e7 would make 2. Ng5+ ineffective).
- White’s dark-squared bishop is on the c1-h6 diagonal (this effectively prevents 2. …Kh6 due to White’s potential to unleash a deadly discovered check by moving the knight).
Related: Art of Attack In Chess has an entire chapter devoted to the Greek Gift sacrifice.
#3: Double Bishop Sacrifice
This is another key attacking pattern involving the bishop in chess, which all strong chess players ought to know.
One of the most famous instances of the double bishop sacrifice occurred in Lasker vs. Bauer, 1889. The following position was reached, with White to move. Black’s last move was 14. …Nxh5, capturing a White knight, likely expecting that White would simply recapture 15. Qxh5.

Instead, Lasker first captured the pawn on h7 with his light-squared bishop via 15. Bxh7+!
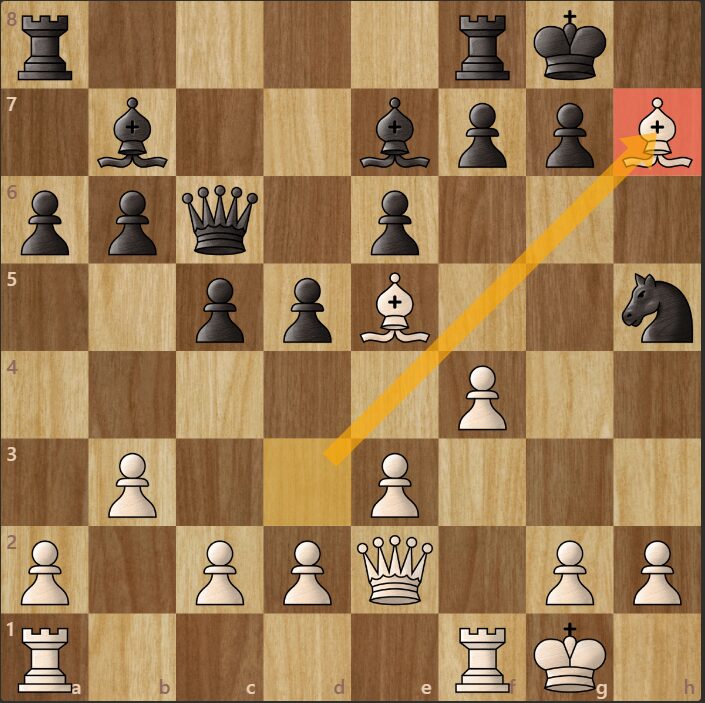
After 15. …Kxh7, Lasker captured the Black knight with check on 16. Qxh5+, whereupon Black’s king tried to seek shelter through 16. …Kg8.
But then Lasker unleashed his second bishop sacrifice with the stunning 17. Bxg7! giving up the dark-squared bishop as well.
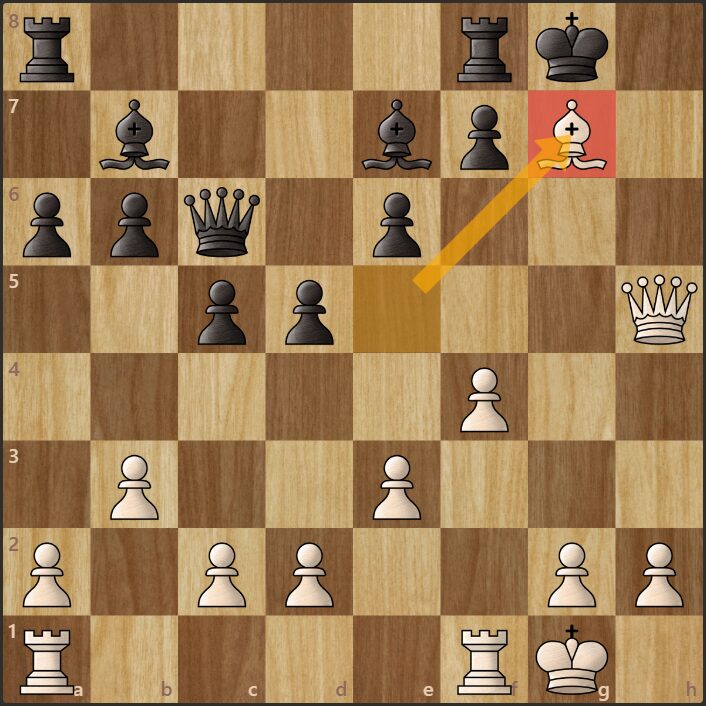
With these twin bishop sacrifices, Lasker shattered the pawn cover around the Black king. Black had an extra two pieces, but these were far from the defense of their king. Meanwhile, White’s queen and rook were poised to strike on the wide open g-file and h-file.
A few moves later, Lasker brought his rook to the third rank and forced Black to surrender his queen in order to stave off the imminent threat of checkmate. Lasker went on to win.

#4: Exchange Sacrifice To Exploit A Weak Color Complex
At times, a bishop can be a stronger attacking unit than a rook. A sideline from the game Reshevsky vs. Santasiere, 1939, does a good job of illustrating this. It is White to move.
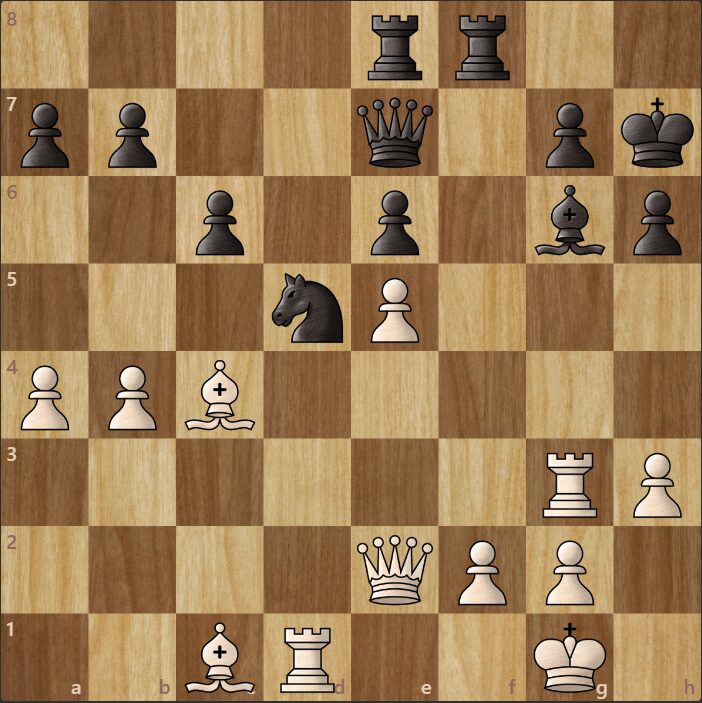
White can create severe problems on the light squares starting with 1. Rxg6!
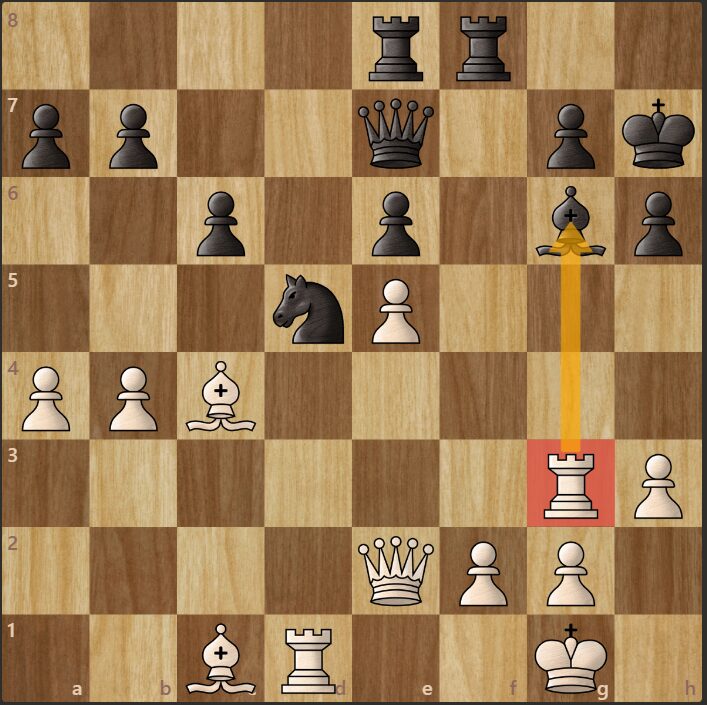
Black must recapture with the king via 1. …Kxg6, whereupon White can follow up with a powerful check from the light squared bishop: 2. Bd3+.
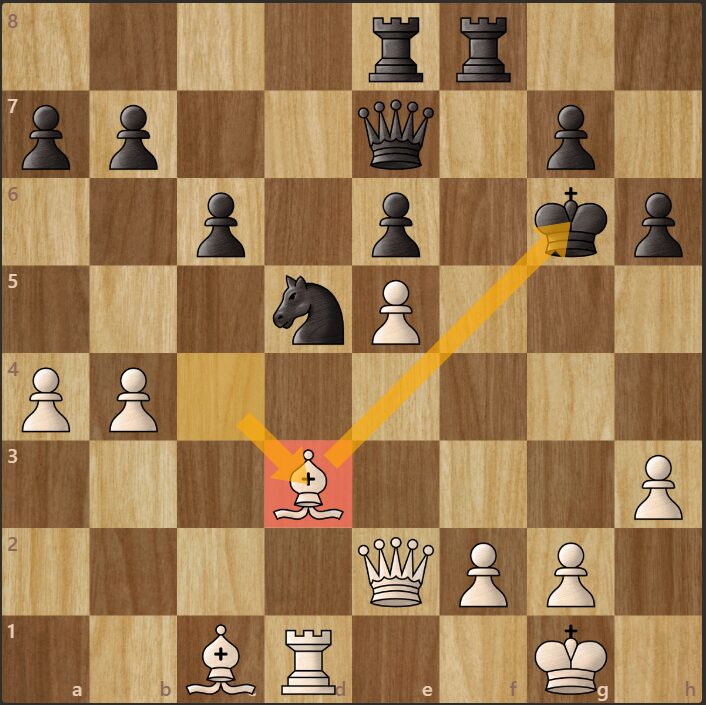
This strong check compels the Black king to escape via 2. …Kf7 (notice that the more desirable retreat 2. …Kh7 is not possible). Then, White can continue building the pressure on the light squares with 3. Qh5+ Kg8, 4. Qg6.
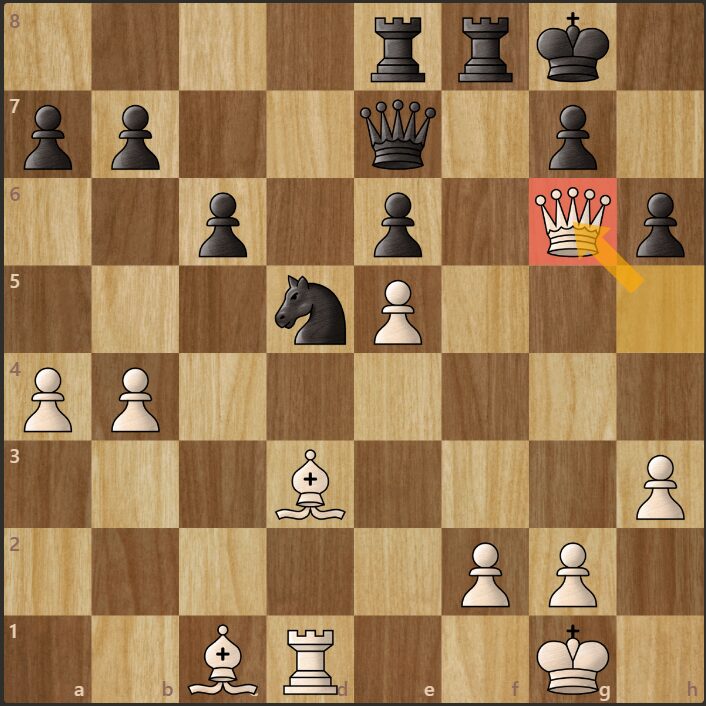
The threat is 5. Qh7+ and Black does not have any good way of preventing it. It is noteworthy to see how, due to Black’s weakened light squares, White’s bishop can move in a way that creates more threats to Black’s king than the White rook could.
#5: Trading Off The Defender Of A Weak Square
Bishops are not exclusively used to attack the enemy king. An understanding of positional chess strategy reveals that sometimes the best use for a bishop is to trade it off for its counterpart.
We can see this in the game Williams vs. Poobalasingam, 2008 where, in the below position, it is White to move.

Williams, with the White pieces, wanted to occupy the f5 square with one of his knights. This square is an outpost, given that Black’s pawns on the two adjacent files have both already advanced to the fifth rank.
Related: Improve your knowledge of positional chess with Jeremy Silman’s classic book How To Reassess Your Chess.
Recognising that Black’s light-squared bishop was a key defender of the f5 square, Williams initiated the following maneuver: Be2 -> Bg4, looking to exchange bishops.
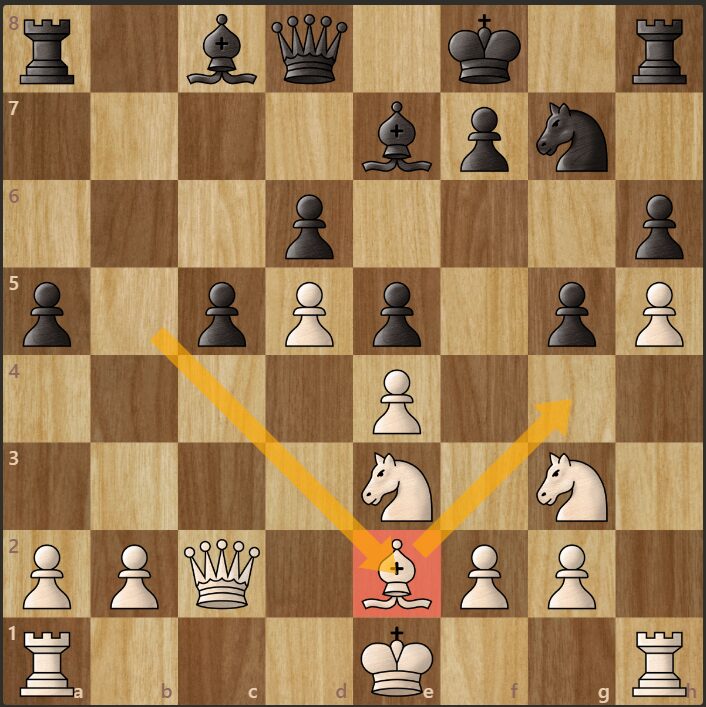
Trading off Black’s light squared bishop gave the White knights better access to the f5 square. Always be on the lookout for opportunities to make the correct trades in order to strengthen your grip on outpost squares.
#6: Occupying An Outpost Square
A bishop in chess may also look to occupy an outpost itself. The opportunity to do so arose in Furman vs. Smyslov, 1949. Black had just made the aggressive pawn advance 17. …f5.
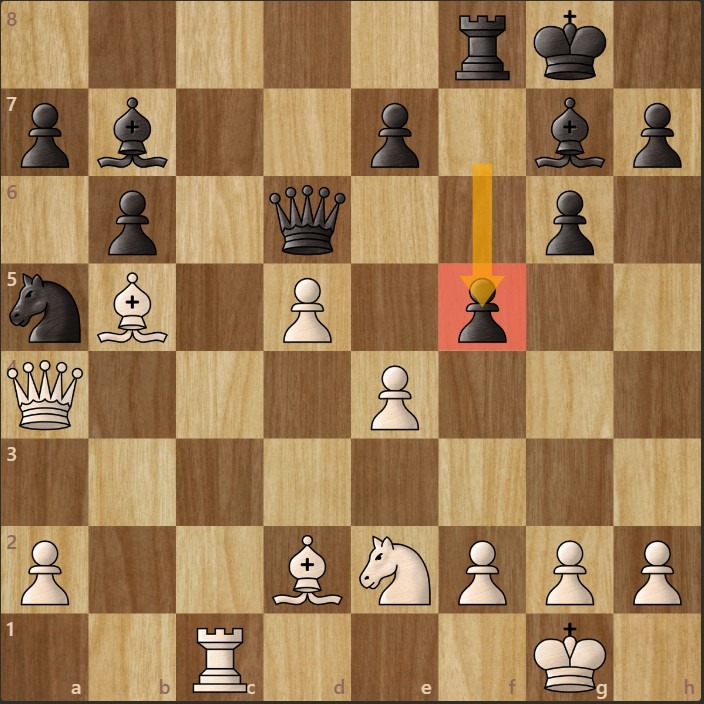
This created an opportunity for White to bring his bishop into the new outpost that had just been created, starting with 18. Bd7! intending to bring the bishop to e6 next.
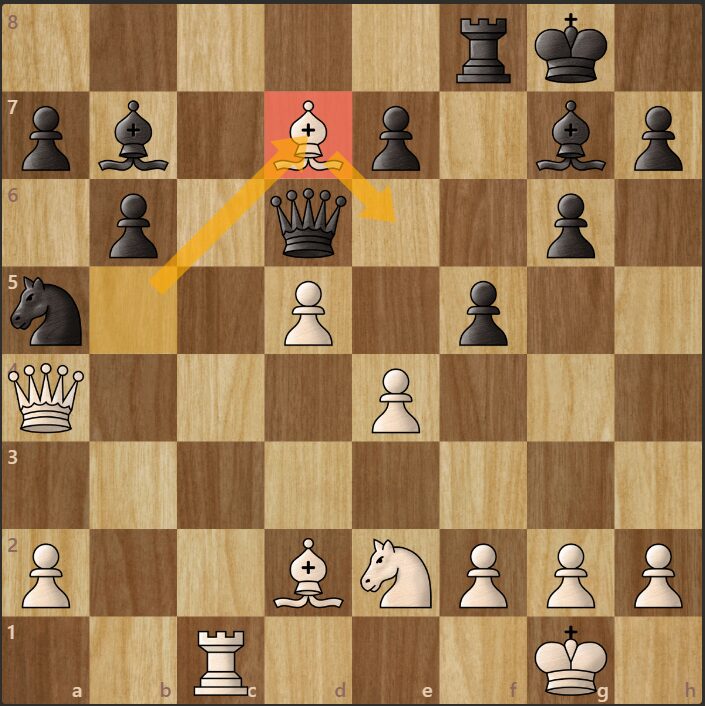
This powerful light-squared bishop on e6 led to king safety problems for Black. White went on to secure victory against his redoubtable opponent.
Related: Check out this game collection from Andrew Soltis of great Soviet masters of the mid-20th century: Smyslov, Bronstein, Geller, Taimanov and Averbakh.
#7: Supporting The Queenside Majority
Our final example of the bishop in chess comes from Botvinnik vs. Kmoch, 1934. This is a model game for an important middlegame chess strategy - advancing the queenside majority.
First, Botvinnik brought his bishop into position via 24. Bd7.
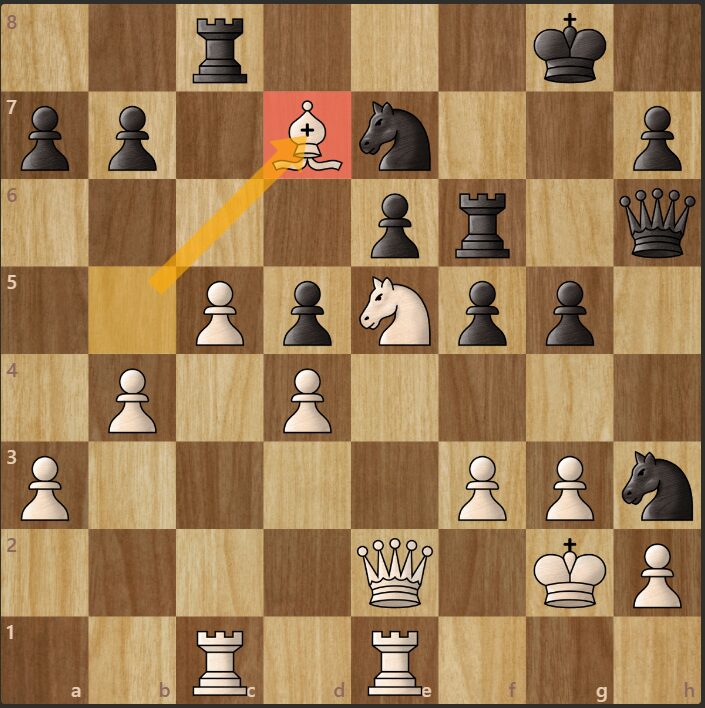
Then, Botvinnik was able to advance his b-pawn with 25. b5 and then the key break 26. c6.
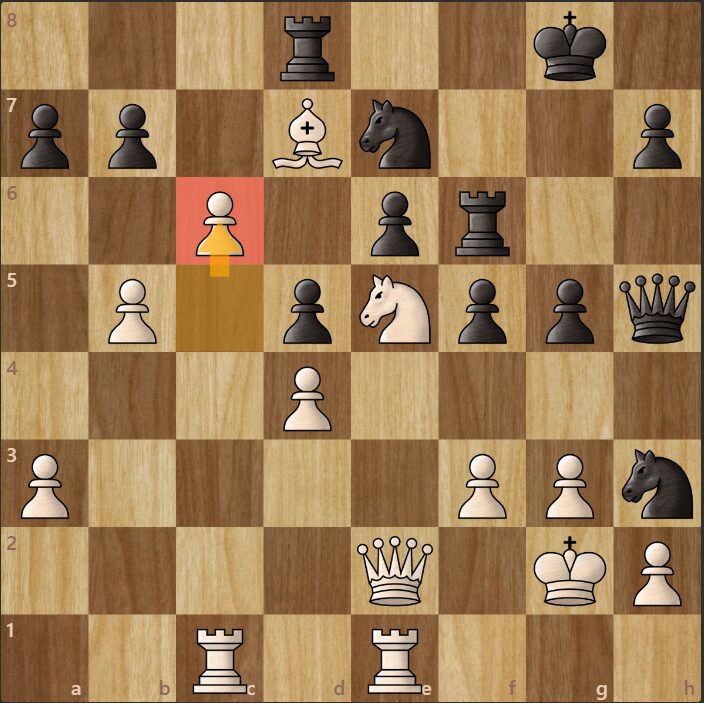
This queenside breakthrough is often the right idea for the player with the queenside majority. The bishop in chess can help bring this plan to fruition.
With no good way to stop the c-pawn’s further advance, Black resigned in short order.
Next Steps
Learning the strengths of each chess piece is essential to becoming a stronger player. If you would like to continue your education, we suggest GM Johan Hellsten’s excellent guide, Mastering Chess Strategy.

This book has sections dedicated to each piece, including the bishop. There are also exercises that will help test and reinforce your understanding.
Frequently Asked Questions
The bishop in chess moves diagonally. It has long-range movement, meaning that it can move as many diagonal squares as it likes so long as every square on its path is unoccupied. Bishops always stay on squares of a single color - either the light squares or the dark squares. It can be an effective attacking piece and is often involved in sacrificial combinations.
The bishop in chess is called by other names in other languages. For example, in Russian it is known as the ‘elephant’, in French as the ‘jester’, in German as the ‘runner’, and in Czech as the ‘gunner’.
Each player begins a game of chess with eight pawns, two rooks, two knights, two bishops, one queen, and one king.
Collectively, bishops and knights are called “minor pieces”. In general, bishops are considered approximately equal in value to knights. However, whether a bishop is better than a knight in any given game depends on the position. Bishops tend to perform better in open positions, while knights do better in closed positions.
The bishop pair refers to a situation in a chess middlegame or endgame in which one player still has both bishops, while the opponent has either one or no bishops remaining. The bishop pair is generally considered to be advantageous, as two bishops working in tandem can control many squares on the chess board, particularly when the center is open.